
Amongst some of the photography skills I’ve been practising recently is taking images through glass or wire fences. For this post I’m going to share some of the pictures I took whilst at Exmoor Zoo last week and use them as an excuse to share some tips with you. I used my Canon 5D Mk2 and two lenses – a Canon 24-70mm and a Tamron 70-300mm.
When shooting through glass I have only found one approach that gives a high success rate. If the subject is away from the window then I can press my lens flat up against the glass. This is an easy way to get rid of the distracting reflections that can ruin many pictures. The camera should be able to focus automatically but in a few cases you may have to flick the focus to manual and sort things out yourself. If the subject is close to the window then you will need a camera with a macro setting (or use extension tubes to reduce the minimum focussing distance).
In order not to clutter up this blogpost I’ve put a list of all the camera settings I used at the end of this article.
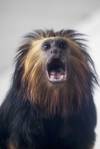
The following shot was the first one I took on entering the zoo. This monkey could clearly see me through the glass and I think it could see its own reflection in my lens. I also tried to treat my animal subjects as if they were human. This meant that I had to concentrate on getting the eyes in sharp focus and, where possible, capture the animal with catch-lights in the eyes.


If the subject is behind a wire cage and is sitting close to the edge then it can be impossible to blur out the cage. Faced with this situation I decided to make the cage part of the shot. This baby monkey was nervously moving through an overhead cage ‘tunnel’ that liked two large enclosures. I feel that by including the cage in the following shot, ensuring that the majority of the face was visible, I managed to create an image that forces an emotion from the viewer.
If the subject is away from the wire cage then it is possible to almost completely remove the bars by using a shallow depth of field. This forces the camera to keep only a thin area of the scene in focus. As long as the area concerned contains your subject then the closest bars will often almost completely disappear. This can be seen in the image below:

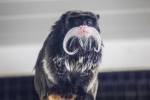
Where possible you should try and position the camera lens close to the fence in order to enhance the blurring out effect. If this isn’t possible you can use the bars for creative effect. I thought that this monkey looked a little crazy and I loved the orange eyes and so with a bit of me shuffling around to get the bars in the right place I took this shot:

Here are two examples taken through glass. This meerkat was enjoying the heat from a lamp and so was well lit in the dark enclosure. The light meant that my camera had enough contrast to focus and so it was relatively easy to get the shot. For the second image I used the telephoto lens and concentrated on getting the eyes in focus and with a glint in them. I’m not sure why I chose such an usual angle for the second shot, it just felt right 🙂


It took a great deal of attempts to get the final shot of each animal. For the following two images I took a total of thirty images. The difficulties I had were shooting at a long distance, through glass, in poor light with two subjects that just didn’t want to look at the camera. Patience in these scenarios is a virtue.


You may have noticed in the Maned Wolf image there is a vertical blurry streak to the right of the frame. This was a tall piece of grass that was close to the window but i didn’t notice at the time of shooting. When shooting I rarely check my images on the viewfinder other than for a quick look to ensure the settings are correct. It means I can spend more time looking for the ‘decisive moment’ but does run the risk of errors like this.
Sometimes it is just not possible to get the perfect image in camera and I may have to tweak the image later. I use the excellent Lightroom 4 software for the majority of my quick fixes. Below I’ve shown two images I took of ‘The Beast of Exmoor’. I was shooting through thick glass that was partially frosted. The leopard was pacing around it’s enclosure and I took a few minutes to work out where the best light was and the pattern of the animals routine. I only managed to get one usable image of the animal.
The first is the image as it came out of the camera. The second image shows what can be done with a few simple clicks. I increased the contrast, darkened the blacks and adjusted the vibrancy and white balance. It meant I was able to take an image that looks like it was taken through a steamy bathroom window and turn it into something acceptable.


Some of the most complicated shots I took were of the zoo’s two cheetahs. There is a viewing platform available but I wasn’t happy with the ‘shoot down’ angle that this created. It was impossible to make eye contact with the animals and so I moved around the enclosure. One of the keepers came out to feed them and give a talk about the animals. This proved a good distraction for the cheetahs and meant they stayed still for a while. The downside was that my new location was behind two widely spaced layers of mesh fencing. The camera could not auto-focus and so I had to focus manually. Using the eyes of the large cats as aiming points I was able to blur out the fences – but look closely and you can see the pattern of the fence causing a visual disturbance in the images.


And a final flurry of images for you to look at – all taken in difficult circumstances:

Professional Help
If you are still struggling with taking pictures of animals in the zoo it may be worth checking to see if the zoo can help. At Exmoor Zoo you can hire the help of a pro with prices that start at £75. It doesn’t necessarily give you any more access than as a normal visitor but you may find it helpful to have someone point out opportunities that are being missed or settings that are wrong. I haven’t used this service so can’t vouch for it but you can find detailsHERE if interested.
Settings
Where possible I used the camera in Program mode – this allows the camera to pick what it thinks is the best setting but gives me creative control over speed and aperture with a simple click of a thumb wheel. I set the camera to ISO 400 for the whole day. This allows the camera to shoot faster and so reduce camera shake, important when using a zoom range at maximum length.
1. Monkey Eyes 70mm f3.5 1/125sec
2. Baby Monkey 300mm f5.6 1/160sec
3. Bad Hair 300mm f7.1 1/500sec
4. Eye Target 271mm f8.0 1/640sec
5. Meerkat 81mm f4.0 1/80sec
6. Meerkat Portrait 259mm f5.6 1/80sec
7. Caracal 300mm f6.3 1/400sec
8. Maned Wolf 300mm f5.6 1/320sec
9/10. Leopard 84mm f5.6 1/160sec
11/12. Cheetahs 300mm f5.6 1/250sec
13. Golden Tamarin 209mm f5.0 1/80sec
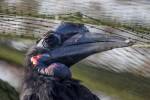
14. Hornbill 300mm f5.6 1/250sec
15. Emperor Tamarin 190mm f5.0 1/30sec
16. Howler 60mm f2.8 1/60sec
